
When you finish reading this post, you will quickly learn how to use Microsoft Word to create a beautiful mind map, in a creative and organic way with its lines in the shape of tree branches, in the same way Tony Buzan does it.
You will obtain professional results, very similar to those of programs specially designed to elaborate mind maps such as: ImindMap.
Follow carefully the simple steps I will give you below, and you will be able to make an incredible and authentic mind map.
✅ See also the new Nursing Concept Map template in Word for free download 👀
How to make a mind map in Word?
It is worth mentioning that you can use Open Office, Libre Office, or Google Docs. They all have basically the same tools and you can easily get an idea of how to apply the steps I will explain in those programs.
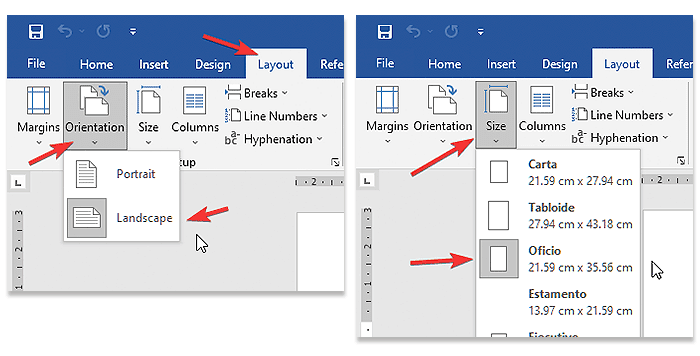
Before we start, we must set up the work area to have an adequate space for mind mapping.
In the ribbon click on Layout > Orientation and select Landscape, then right next to it click on Size and choose Oficio. This way we will have a larger and more comfortable space to work in.
Now, let's get to work! 😄
1st step: Locate the central image
Find an image that represents very well the topic to be mapped, then over the image or next to it, write the most important central word or a short phrase.
Example: In my case, I am going to make a mind map on the same Mind Map. Therefore, I find it convenient to place an image of a brain.

2nd step: Create the organic shape lines
Again go to the options menu, click Insert > Shapes, in the Lines part select the Curve tool.

Start from the center image by clicking first on the area where you want the "branch" to start, then continue clicking further where the curvature will be applied and so on until you reach the same starting point.

Right-click on the branch and select Send to bottom. so that it is always underneath. Also, go to Format Shape > Shape Outline > No Outline. This will remove the outline from the shape.
👀 Check out also the mind map templates to edit online in Google Slides and Google Docs, they are free.

3rd step: Creating the rest of the branches
To make the next lines or branches, it is as simple as copying and pasting the one you have already created with control + c and control + v. Then in Shape Format go to the Rotate objects icon and select the appropriate one.

Create the number of branches that your mind map will have and distribute them evenly from the central image. (As if they were clock hands) - It is important to give a different color to each branch. Optionally you can apply a gradient to the colors.
To change the color, select the branch and go to Shape format > Shape fill. Choose the color you like.

4th step: Labeling the lines or "branches"
Now to give it extra genuineness and make the text have a curve that slightly fits the curve of the branch, we do the following:
Go to the Insert tab > WordArt, choose the one you like. The text in black or the color of the branch preferably. Change the text to the keyword that goes in the branch.

Go to the -Format> tab in WordArt Styles go to Text Effects > Transform. In the part: Follow path, look at the curves you can apply to the text.

Drag the text on the branch, place it in an area by matching the curves. If you want, you can also change the font type.

5th step: Lines or second level branches
Once you have labeled each main branch, it finally remains to add the secondary branches, which are smaller and sprout from the main branches.
To do this, we will simply make some lines with the same Curve tool and change their thickness, we will also give them the same color as the branches.


In the same way, copy and paste the branch as many times as you need and place them as shown in the image.

6th step: Labeling the secondary branches and adding the images


No comments:
Post a Comment